
I mentioned earlier this week that I’m doing some wedding-related sewing for a friend. The dress was easy to hem and caused minimal stress. I’ve found fabric for the sash and will sew that this weekend and the bustle shouldn’t be to hard. What has caused me the greatest amount of stress is the veil — which I thought would be the easiest.
First, let me say that this world of wedding stuff blows my mind. When my friend and I first met and she told me she wanted a ‘bubble’ veil, I had to google it. I thought a veil was a veil was a veil. I’ve done very well over the last 10 years in avoiding most people’s wedding planning. I seriously get hives over these kind of detailed things and just zone out.

So, here’s the veil she wants. I think in the UK it’s called a ‘bouffant veil’. I like the vintage 60s goodness of it (hmmm. I think my mom got married in a veil like this. Will have to ask her).

After much internet searching I found a very few links on the directions for this particular cut. And, this is what I came up with after three attempts.
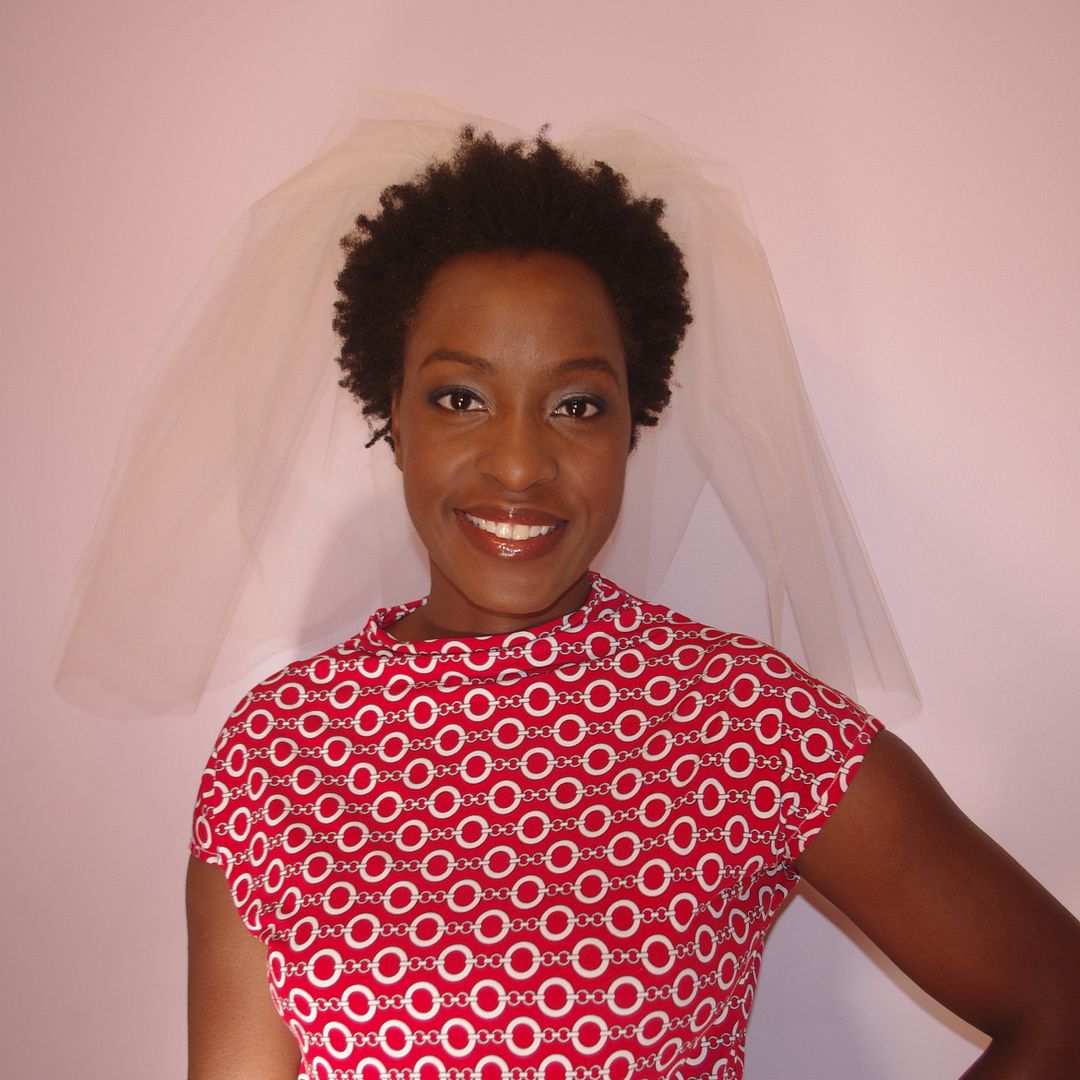
Mine is a single layer (she wants two). She wants shoulder length. But, I can’t figure out that sloping back and front. I did round the corners, but they seem to be at the front not at the end.
This is the view on top of my head. I also think two layers will bump it up at center front / back.

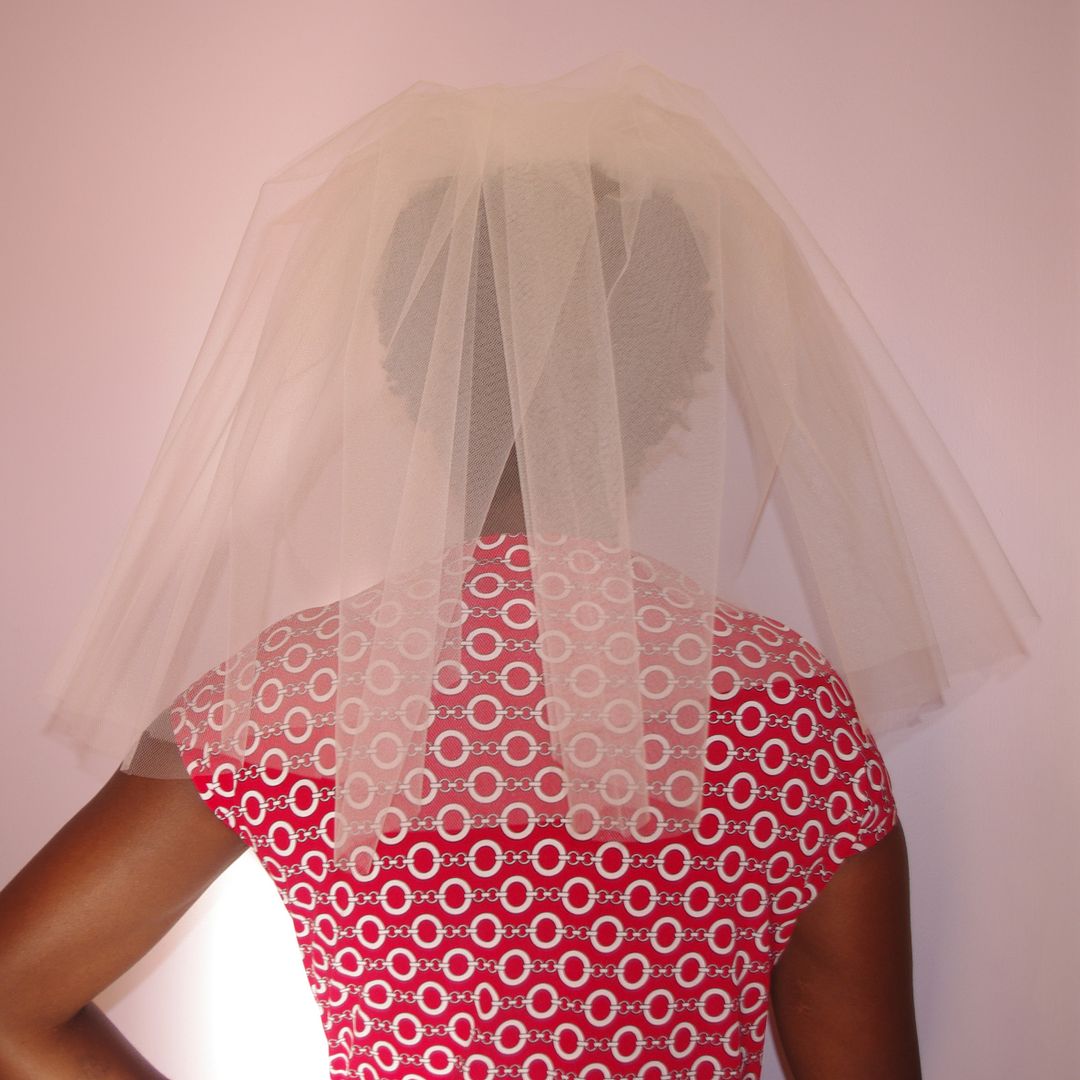
Here’s another one I saw on her board with a veil from the back.

And here it is when I use the comb lower down

I’m going to try one more time cutting the tulle in an oval shape with two layers. But, after this, that’s it. I don’t want to keep plugging away and have it not be ‘right’. And, I’d also like to give her time to order one if I can’t make it work.
Here’s a link to the basic shape I cut
(I’ve reached my viewing limit but I think it’s page 58 or 61)
Oh, my top is from Burda Magazine 4-2011-122 reviewed here
Right… open to suggestions. I pull the scissors and tulle back out on Saturday morning….
I’m open to any ideas on how to get a more slopey shape…

The one in the top photo is two layers, but they are connected at the hem. That may be why it’s called a bubble veil.
The pattern piece is a big oval or football shape. Fold it along the widest axis. Gather along the open edge, through both layers. Pull up your gathers and make the folded edge into the hem. Pull the layers apart to form the bubble.
I hope this makes sense!
I just looked again. I don’t think you should fold it first then gather.
Start with the big football shape. Gather around the perimeter. Pull the gathers up, fold the raw edges under to form a small circle. Attach the gathered edges to the edges of the headpiece.
Thanks, Claudine! Do you think this is the stiffer bridal tulle or the softer flimsy kind? I used the stiffer kind becaus I was thinking one layer. But, the second one looks flimiser. I’ll get the softer kind tomorrow and try. I may have to draw a little pic and ask if you think it’s the right way to cut!
I would bet that it’s probably on the stiffer side. The softer kind might flop a bit instead of forming a bubble.
I like Margaret’s suggestion to construct it kind of like a fabric yoyo.
To me, the 2 examples that you found look like they don’t have cut edges. Like they are a big roundish shape with the cut edge gathered and attached to the comb. That would give her the 2 layers and the tricky part for you would be figuring out the shape of the circle (oval, ellipse, whatever). Kindof like a giant yoyo in the quilting world. Does this help any or did I just confuse things? I don’t know anything about veils and am just going off what I see in the pics.
The look on your face in those last photos! Never have I seen a woman less enamoured of having to wear a veil. Oh goodness, I feel your stress. I’m like you, I do my best to avoid all things wedding-ey. Your friend had better buy you a really big present for all of this!!! I wish I had some advice, but I don’t, I’m afraid.
Hello-I agree with above posters that the edges look doubled rather than cut. I wonder if the veils are not made by starting with a circle-ish shape, gather around all the edges and cinch in the middle, so you have a double-layered pouch-type thing. Then you can offset the gathering so it’s shorter in the front and cascades like the photos, securing both layers to the comb. Not sure if this makes sense, it’s just an idea!
I think you are also right… I think I also need a wider comb…
Yes! I second this one! (should’ve read more closely before I posted..)
IMO, Margaret in the comment above has the right idea! The bottom edge is not cut but is the fold of the fabric. All shaping is done when attached to the comb. Good luck! I made two veils for my daughter, one for the ceremony and one for the reception, and they were a lot of work!
I’ve made quite a few veils in the past (and no, I do not sew for profit; the first one was for our oldest daughter and remaining were from our children’s friends – they so nicely volunteered me). Go to a bridal store and take a close look at the veils. See how they are cut, hemmed (if they are), where they’ve attached to the comb, etc. You can SO do this – just get the dimensions by eye-balling and write down what you see. Pretend you are searching for one for yourself and comparing/measuring for comparison when you get home. Also, small pearls sewn into the veil here and there look gorgeous.
The picture makes me think it needs a “bump it”, the “as seen on tv” hair comb!
PS – I agree with the other people that commented – the first one does not look cut and this is what is giving it the bubble effect/look. This one may be the easiest of the two. Looks like the effect of the bubble/airy-effect is all coming from the doubling of the fabric. Cut as the first poster mentioned and sew once you get the bubble that you want.
Figure out how long she wants it and how wide, double both of those proportions and add a little for the loss of length during gathering and attaching to the barrette and you will have a huge oval with which you gather the entire outer edge. At JoAnn’s there are many types of tulle, some better than others for something that needs body. Don’t use the flimsy type if she wants poof. I use the flimsy type for cap sleeves but the beefier type for veils and adding poof to petticoats.
I did skip the flimsy stuff and went slight sitter. I think I’m a little worried that if I now double the bottom, what I have will be too flimsy? But, I have eight more yards of it to keep trying 🙂 Thank you!
i think you’ll nail it with all this advice– i just wanted to say i love your pictures. seriously. the lighting, the background…. how funny is that.
I agree with some comments. This is an oval, folded and gathered. It does not need the very stiff one, but the somewhat stiff tulle. It will be gorgeous! Let us see after you made it. I believe the fullness will be proportional to the size of the oval you cut: the bigger, “fuller” will be. Good luck!
The Pinterest veil appears not to have a hem. It looks like a long oval, folded, and then both “ends” gathered as one, quite tightly. Then the gathered bit is glommed onto a comb. It’s a beautiful look — it does looks like a soap bubble. I’d go more tulle than net, and fairly soft. It may be a rectangle … you’ll have to include the open sides in the gathering, then … and that may end up looking more like a motorcycle helmet, now that I think of it.
Totally agree with Claudine’s second take. Think of it as a pouf skirt, only for your head :-).
You have 2 solutions: one is stiffer tulle folded once. Another option is 2 layers of softer tulle, I’d make the inner one clearly smaller and make sure not to gather them together.
It’s true you do not look enthused by this project :-)..
I didn’t wear a veil at my wedding (*gasp*), nor have I ever made one, so I’m not help there. Instead, I’ll give you moral support and snicker at your less-than-enthusiastic pictures of trying on the veil. 😉
Good luck!
Yes! I see we’re all on the same track…it’s a big oval…I’d almost say an egg-shaped oval, so that the top will be smaller than the bottom. Gather around the cut edges and pull them all to the center (think fabric yo-yo) , then offset the gathered part towards the narrow end. I did my daughter’s veil last year, and I had a ribbon stay cut the same length as the comb that I gathered it all up to. And for that soft fold…I’d definitely use the lighter weight tulle.
You’ll get there! 😉
This might help:
http://www.ehow.com/how_12019493_make-bubble-veil.html
Yes, I agree with the others, in fact, you made a blusher veil. I’m sending you a pattern photo of a veil, you can pretty much see the pattern from there, “bubble” veils were very popular in the 1960’s. Bubble veils look just how they sound, with more volume toward the top so that the veil gently curves inward at the bottom. This link shows the pattern pieces on the pattern back, no need to buy the actual pattern. http://www.etsy.com/listing/105273832/1960s-womens-bridal-veil-pattern-vintage?utm_source=googleproduct&utm_medium=syndication&utm_campaign=GPS&gclid=CNHG2qqc77ECFQJx4Aod3QQARw
Gawd!! I don’t have a clue and got married in a skirt and top on a beautiful february day, outside, on Orcas Island. No big fancy frock. But you are doing a good job – and I love your hair! You ‘re a great friend for taking this on!!
I think you make a tulle tube (but don’t sew the side seam), gather it at the top and the bottom, then bring the 2 gathered spots together – sort of a bubble that has collapsed – and attach the comb. You might turn the tube inside out before collapsing it.
Yup – a big fabric yoyo! Gathered and set with the gathered edge under the comb. I bet it needs to be a circle at least 6o inches in diameter
I agree with others that commented on it being made using a large round or oval piece of fabric. There is a book called Veiled in Beauty which supposedly has directions for making a bouffont veil. That is one of the few books I don’t have in my collection.